- Featured
B2B Edition
Advanced B2B features for enterprise plans.Catalyst
NewCreate stunning, high-performing storefronts that captivate and convert.Feedonomics
Omnichannel feed and data transformation.Multi-Storefront
Manage multiple unique stores from one account.International
Grow your brand across the globe.

- Launch Services
Overview
Chart your path to success with specialised services.Implementation Project Management
Experts to ensure you launch on time and under budget.Solution Architecture
Seasoned advisors to help you best design your store.Data Migration & Optimisation
Expertise on a clean and clear path to migrating your data.Enterprise Launch Package
Personal training on how to set up and launch your BigCommerce Store.

Professional Services Blog Series
Get to know our teams and how they support your success in this Q&A series.

The Global B2B Buyer Behavior Report
This in-depth report provides actionable strategies to help you sell more online.
How to Add Shadows to Product Images to Increase Sales
Simple, subtle detail like the skilled use of shadows can elevate your product images from amateur to professional.
If you spend time on your product photography and the post-production process, your customers will feel more comfortable spending their time and money with you.
It doesn’t take a big budget or massive team to create professional product images; it just takes desire and attention to detail.
So far in this guide, we’ve covered:
How to set up a product photography studio
How to take product photos with your smartphone
How to use light to get the best images possible
Now, we’ll show you how to separate yourself from the competition by adding shadows to your product images.
Product photographers view shadows as a nuisance most of the time. Shadows can obscure a beautiful product and make product photography look unprofessional. There’s a difference, however, between shadows on a product and shadows cast by a product.
Product image editing lets you use shadows to your advantage.
Realistic shadows that seem cast by your product can give it depth and make your product pop. They are a visual ecommerce image enhancer that add to the product without creating a distraction.
Beauty product websites are typically very good at this. Here are a few examples.
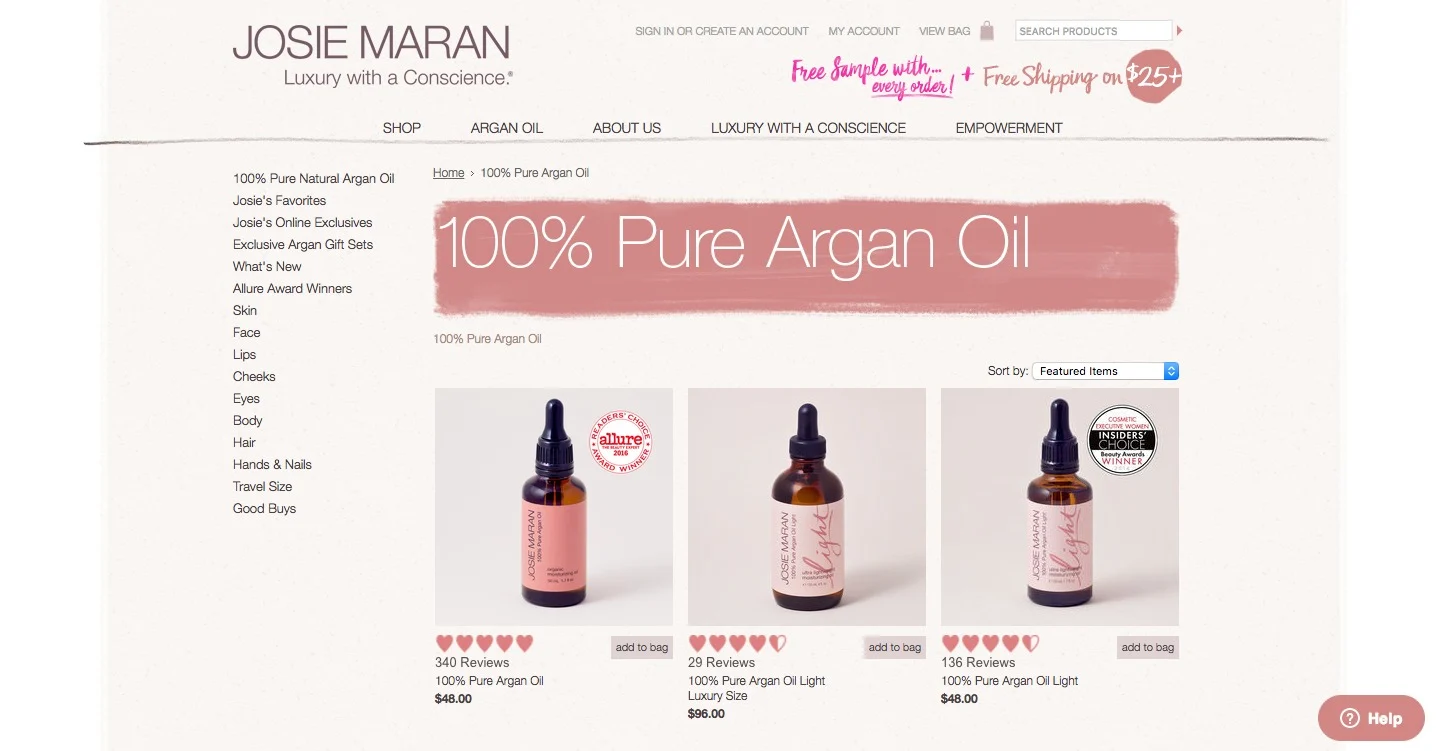
Josie Maran Cosmetics‘ Product Image Shadows
The Stray Whisker’s Product Image Shadows
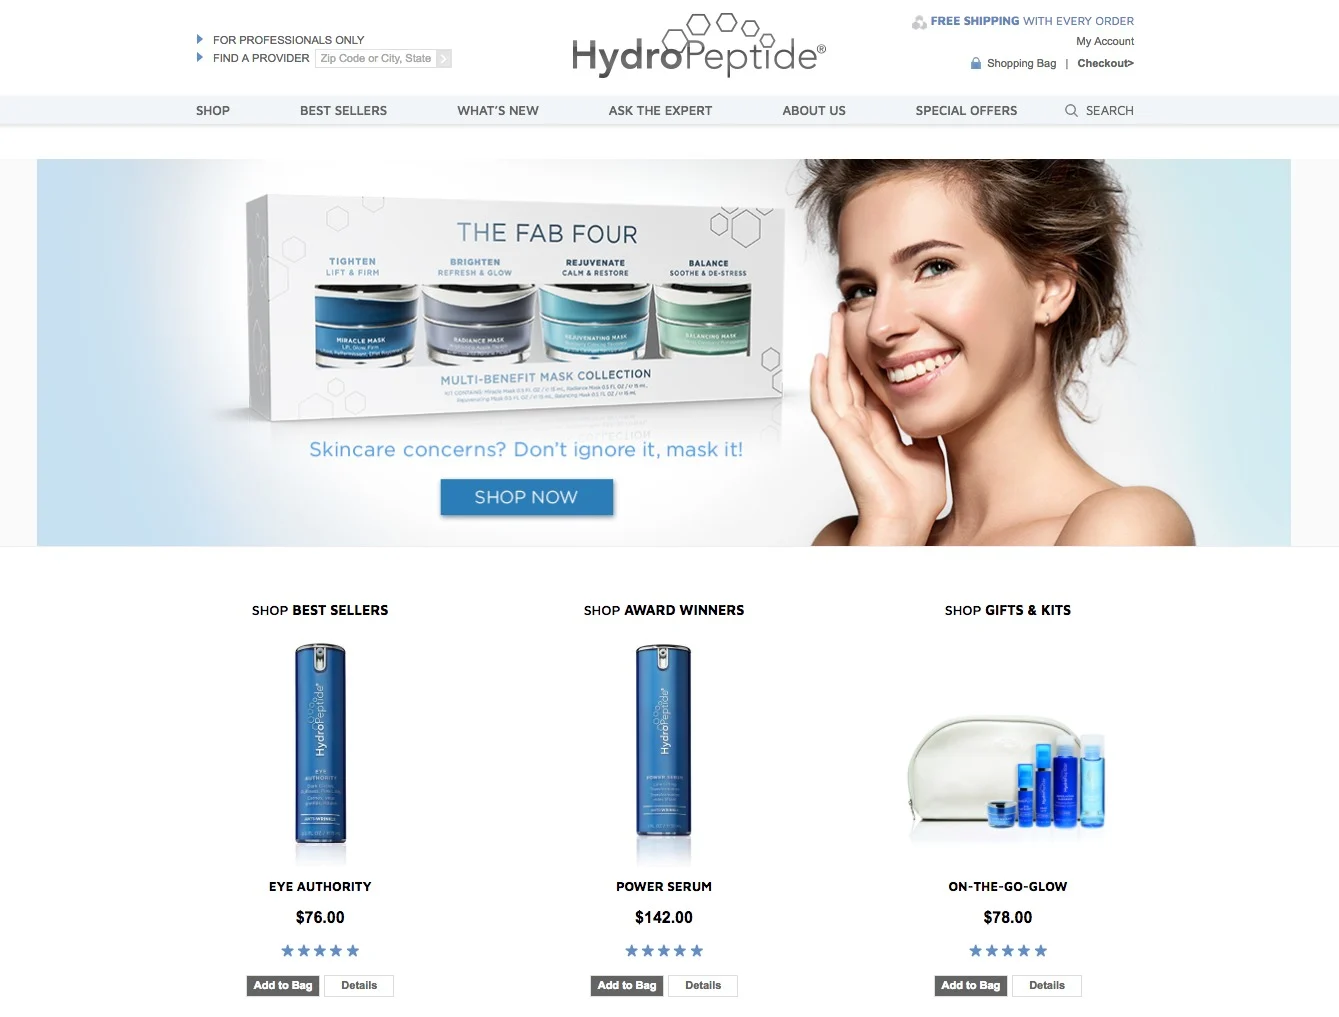
HydroPeptide’s Product Image Shadows
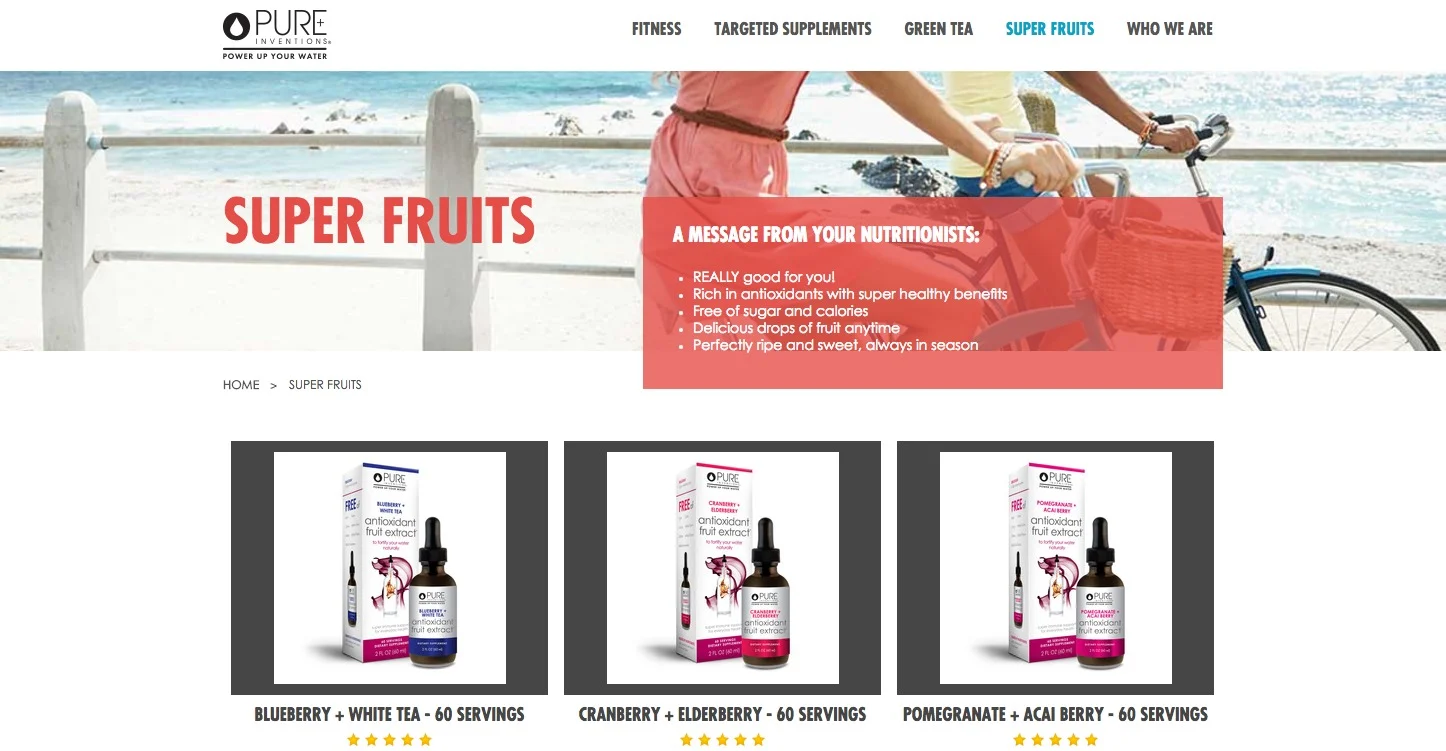
Pure Inventions’ Product Image Shadows
To do this, you can use natural light or add shadow later while image editing in Photoshop, but there are two unbreakable rules:
Your shadows must look realistic.
Consistency is paramount. Be sure to use the same type of shadow on all your product images within the same category.
Realistic shadows keep the focus where it belongs: on your product. Using the same type of shadow creates a clean and professional presentation on your product and category pages.
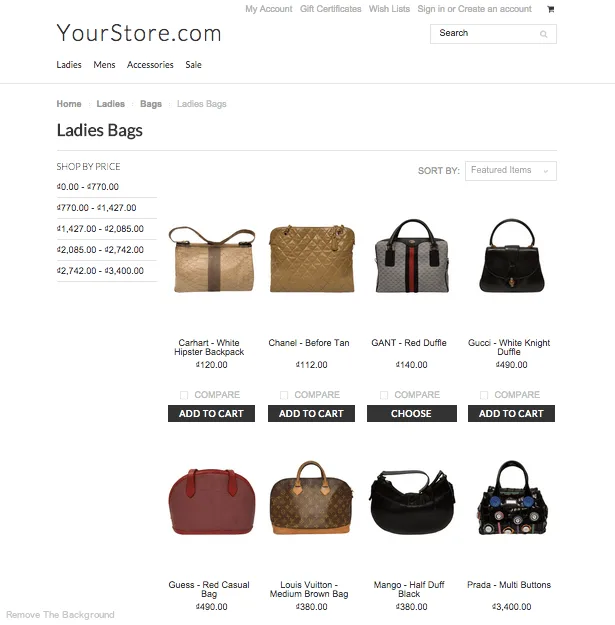
No shadows
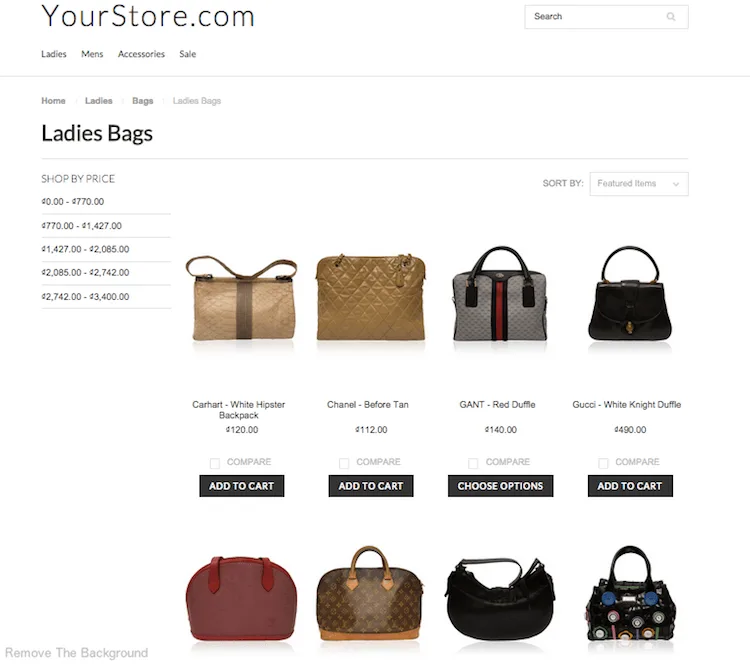
Shadows
There are many types of shadows, but we’re going to focus on three particularly popular and effective choices:
Natural shadow
Reflection shadow
Drop shadow
Which one is right for you? That depends on your product and your photography setup.
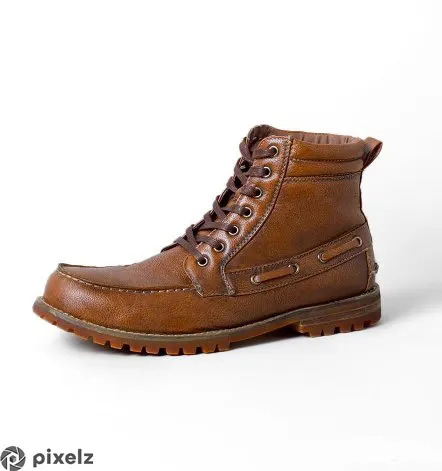
Natural Shadow
Nothing will look more realistic than your product’s real shadow, known as its “natural shadow.” Capturing natural shadow during the shooting process is almost always best, but it’s easier said than done for many products.
The shape of your product and the challenge of lighting it properly may prevent you from capturing a perfect natural shadow, but one can still be added in post-production.
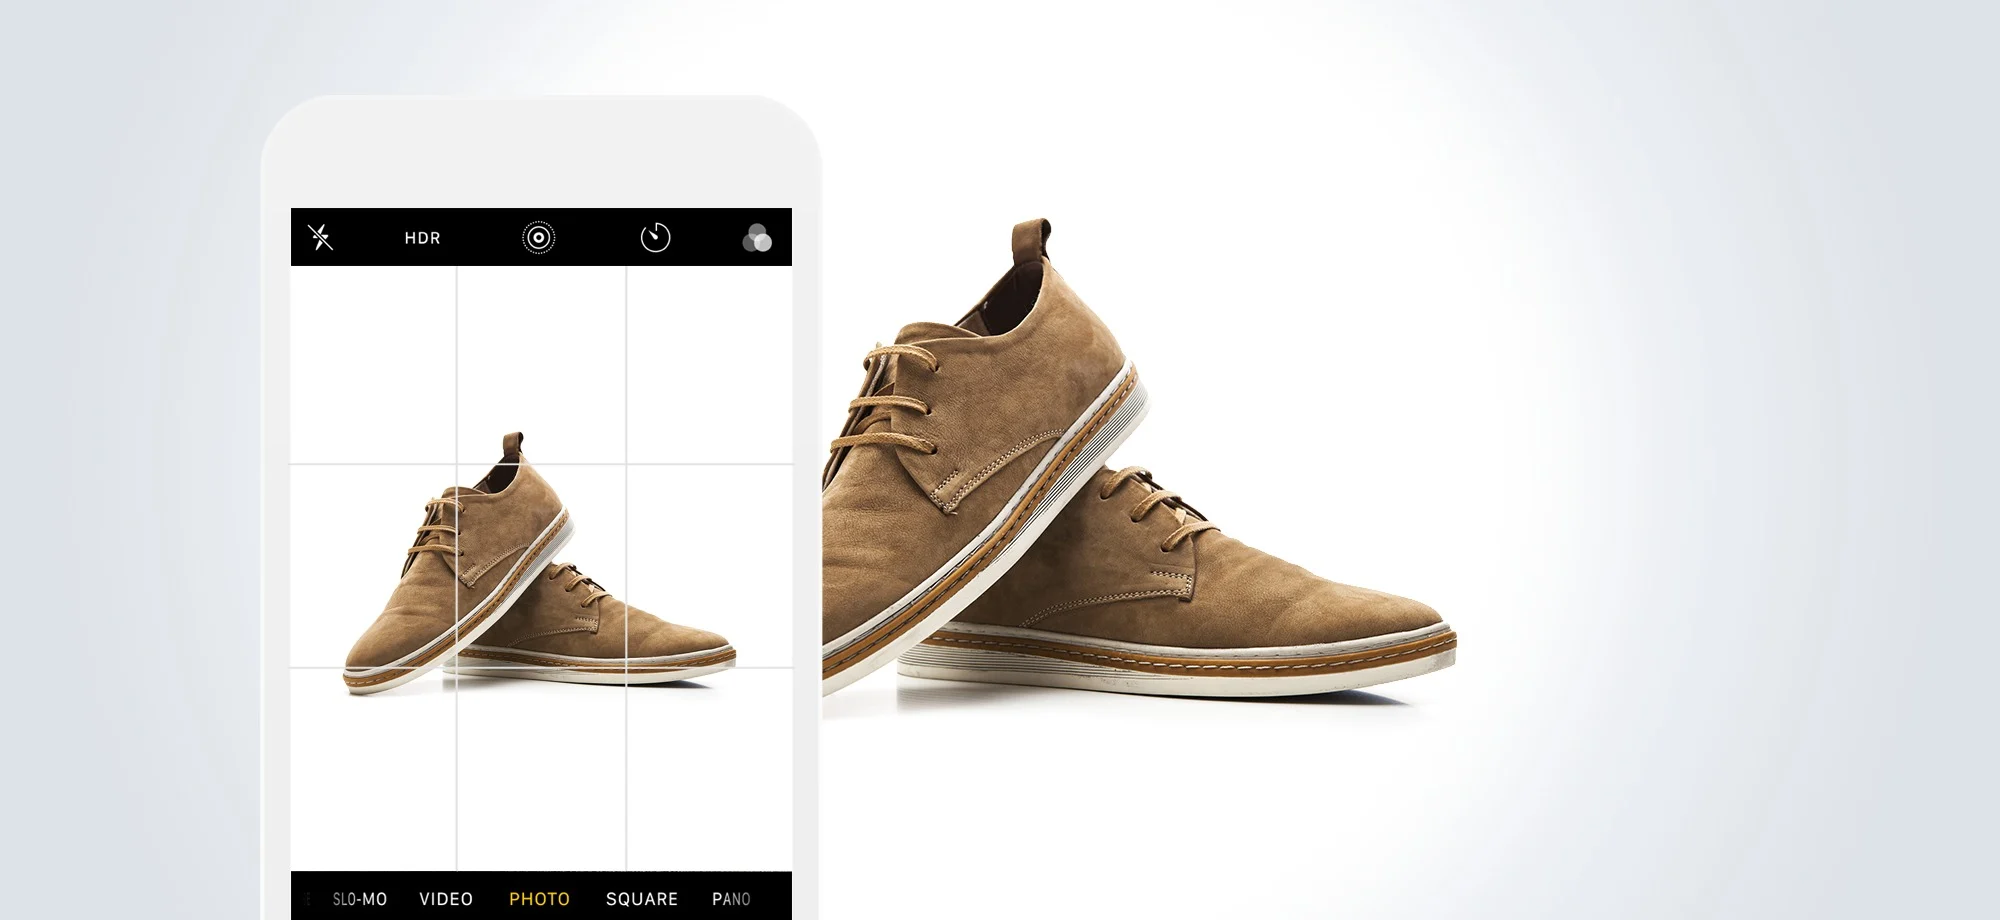
Footwear photography lends itself well to natural shadow. With a little bit of planning and a few moments in Photoshop, you can create a realistic natural shadow that will make your footwear product look professional online.
The best way to create natural looking shadows is to use a light source while shooting the product. Make sure that the light source, whether daylight or artificial, is positioned to the side of your subject.
This enables it to cast the shadow at an angle from your product and give it a more three dimensional look. Photographing your product on a white background will also give the shadow greater depth.
When using natural shadows, the post-production work is minimal because your shadow already exists.
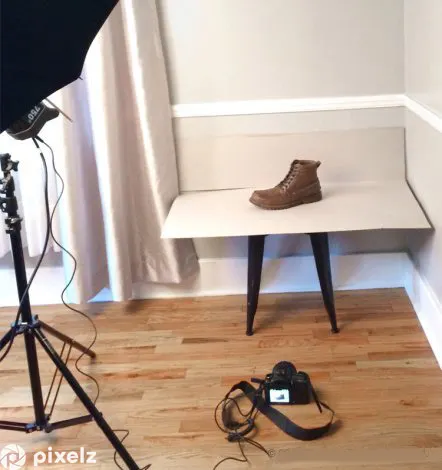
Natural shadow lighting setup
After minimal adjustments
If you are unable to create a natural shadow by using lighting techniques, you can replicate one in post-production.
Follow the steps below and watch the video below to learn how to create a natural shadow using Photoshop.
Step by step instructions for natural shadow
Open your original shoe cut out image in Photoshop or similar, and then a create a new layer with a white-fill background beneath the shoe image layer.
Select the white area around your shoe image to mask out the shoe from the background.
Refine the edges so it has a smooth transition.
Select the areas under the toe and behind the heel to create a curved layer mask. Feather the curved mask.
Darken your curves layer, using the Image –– Adjustments –– Curves tool to simulate the shadowing under your shoe.
Refine the mask a little more for an even better transition.
Carefully brush out areas of your shadow layer manually to achieve the desired look.
You may need to make parts of it less translucent than others, which may mean brushing certain areas more than others to make it look more realistic.
Finally, tweak your shoe layer mask by reducing its opacity a little so it doesn’t look so harsh against your shadow. This helps soften the shadow that may already be there to match the ones you have just created.
That’s it! If you don’t have the right product photography setup to create natural shadow, or if your product just won’t cooperate, you may want to try using reflection shadow or drop shadow.
Reflection Shadow
Reflection shadow makes your product look as if it was photographed on a reflective surface like a mirror. It can make your product images more visually appealing and create a sense of environment, so they don’t look like they’re floating in space.
Reflection shadow can be dramatic, which will help your product stand out from your competitors in multi-channel environments. It’s particularly effective with products that are commonly sold in stores with bright lights and reflective surfaces, like jewelry and sunglasses.
When photographing reflective products like sunglasses, it is important to know how to shape and control light to eliminate reflections and other unbecoming distractions like light spots.
Reflection shadows are dramatic, but they aren’t particularly difficult to add. Let us show you how to add a reflection shadow to sunglasses.
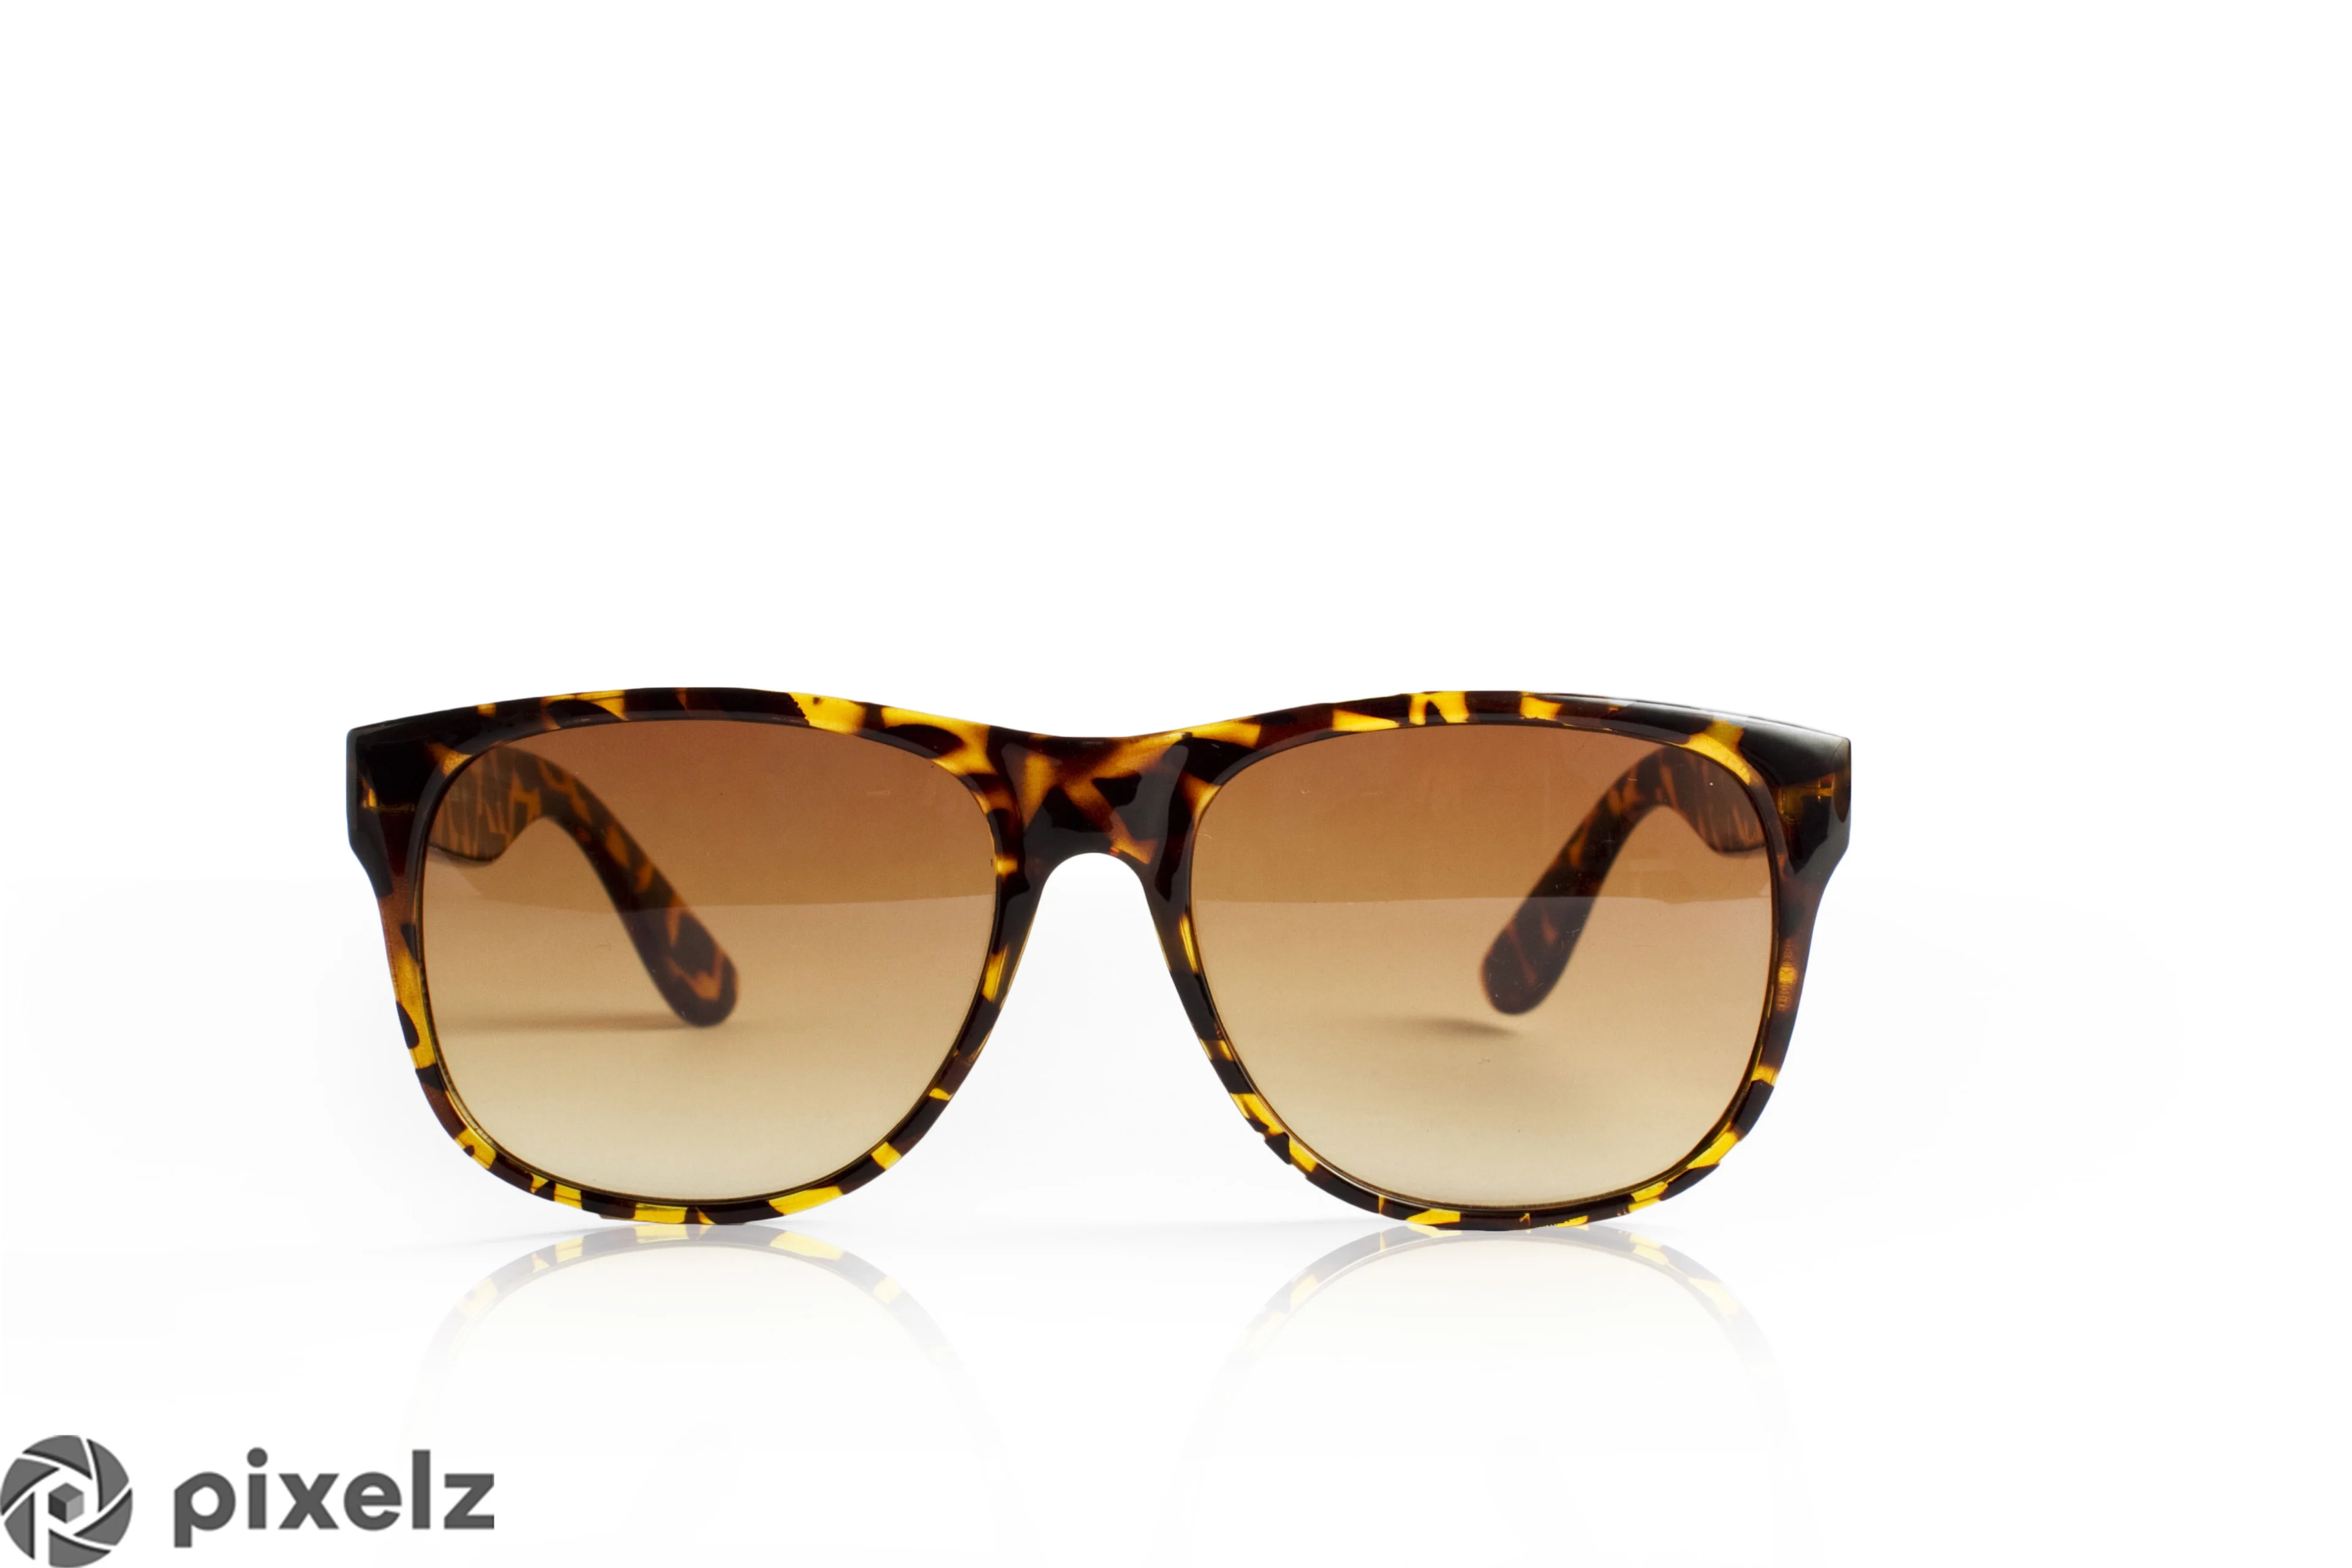
Reflection shadow
Watch the video below to see how to create a reflection shadow in Photoshop.
Step by step instructions for reflection shadow
Create a new layer and fill it with a white background.
Move your newly created white layer to the bottom of the layer stack.
Duplicate the sunglasses layer so that you have two sunglasses layers.
Make a tight selection around just the sunglasses and refine your selection’s edges to be less harsh.
Rotate your duplicated sunglasses layer 180 degrees (upside down, vertically). You should now see two pairs of sunglasses between the two layers: one right side up and one upside down.
Align the bottom of the sunglasses together so the upside down pair of sunglasses looks like a reflection of the other pair.
Add a mask to the upside down sunglasses layer and use the gradient tool. Play with this tool until you get the desired look.
Make sure the most opaque part of the sunglasses is nearest to the eye frames of the right side up sunglasses, and the least opaque part is farthest away from the sunglasses. This will help to create a natural reflection that falls off the farther it is from the subject.
Brush out the sides and top of the sunglasses around the reflected sunglasses’ base.
Continue to tweak your reflection, brushing out more or adding more back in to make it look natural.
Flatten the layers.
These steps will create familiar and realistic depth that adds pop to your sunglasses product images.
If you can’t capture a natural shadow, and if your product doesn’t seem like a good fit for reflection shadow, try using drop shadow.
Drop Shadow
Drop shadows imitate direct sunlight from above, and are both popular and effective with a wide variety of products.
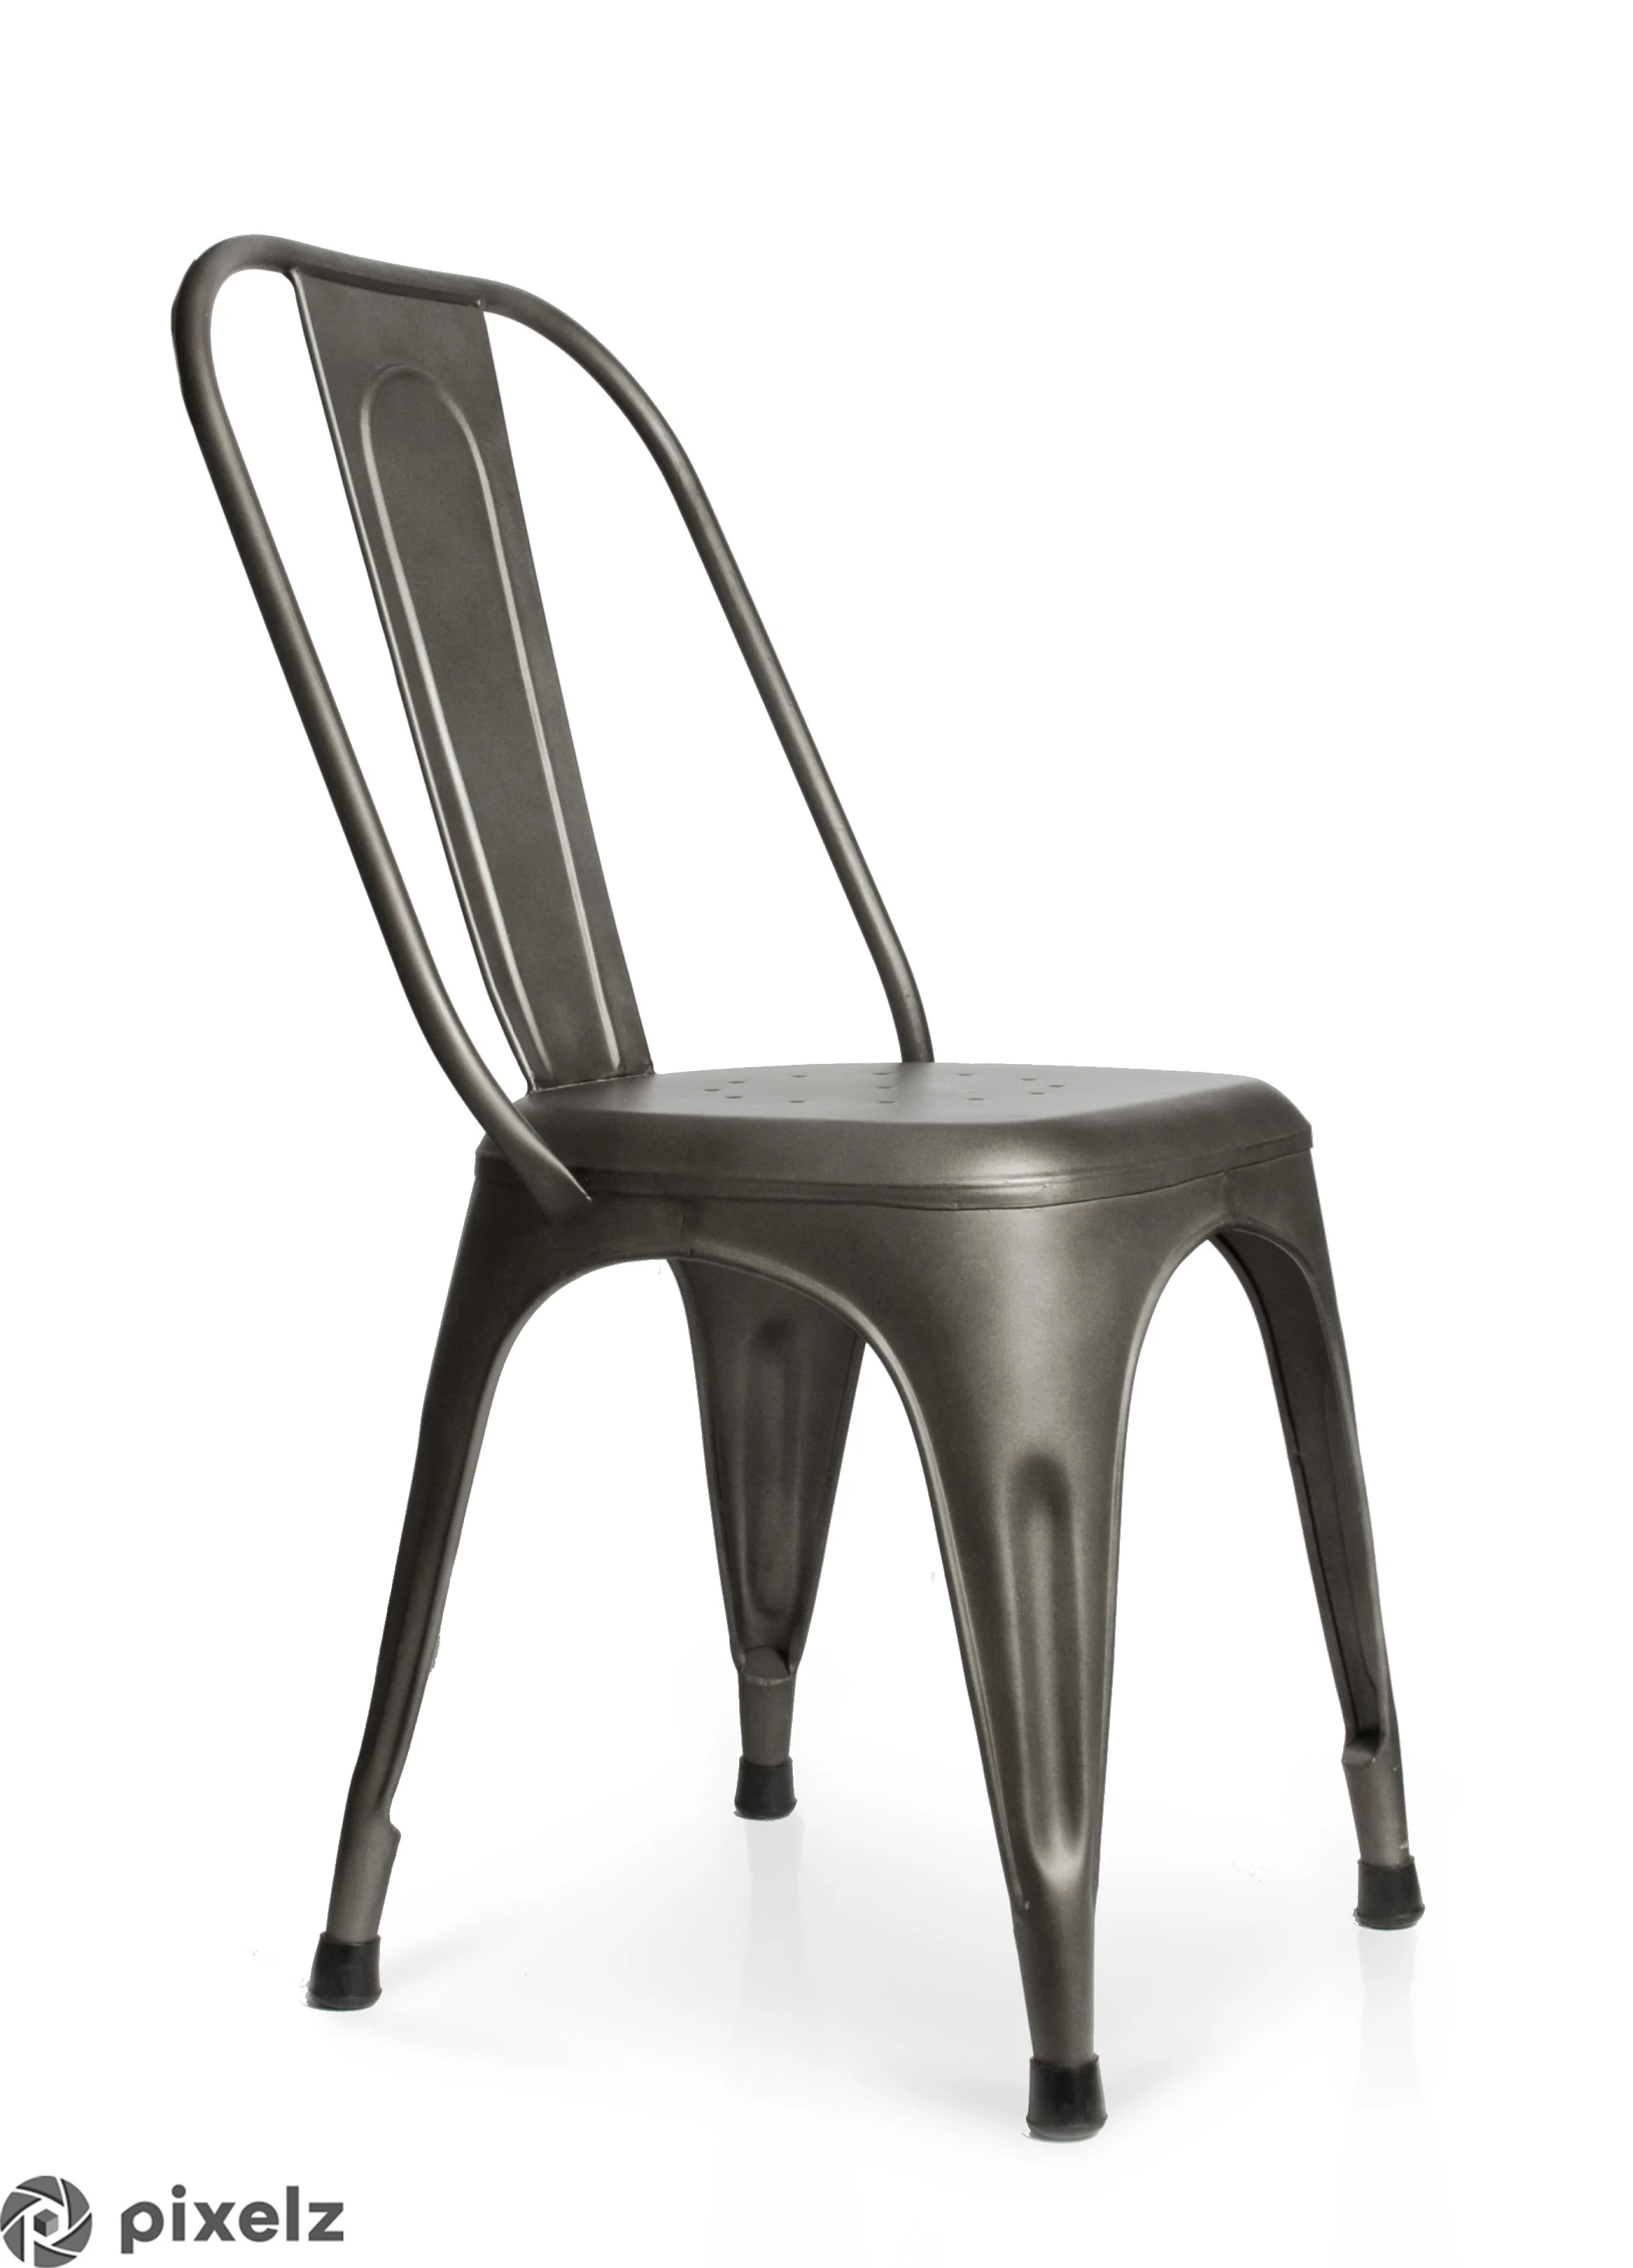
Drop shadow, like natural shadow and reflection shadow, will keep your product from simply floating on a plain background. It’s a subtle effect that adds a professional touch by creating depth for your product.
Let’s take a look at how we can use drop shadows with home furnishings to make furniture product images pop off the page.
Watch the video below to see the drop shadow technique in action and read afterwards for step by step instructions.
Step by step instructions for drop shadow
Use your selection tool to select the white background of your chair image.
Refine the edge of your selection by smoothing out your transition by about 25 points.
Make a layer mask on your chair layer and invert your selection, so you will just see the chair and no background.
Make a new layer, fill with white, and place it as your background layer behind your chair layer.
Adjust your chair to center it and allow for room for your shadowing, and mask out any other things from your background.
Duplicate this chair layer with your new mask selection.
On the bottom chair layer with mask, transform this layer by flipping it vertically. It should now look upside down.
Transform and turn your chair to make the back leg line up to its matching one.
On this layer’s mask, use the gradient tool to make the legs taper from more visible to less visible. It may take some time playing with it to find the right opacity and gradient.
Use your brush to tweak your mask and brush out all of the other legs and unnecessary objects in the frame, other than that one leg.
Play with the opacity and brushing out to make it seem more natural.
Duplicate this layer and move it to your other back leg of your chair.
Using your straight selection tool, make a diamond shape under your chair between the legs’ points.
Refine the edge of your selection by feathering it a lot to allow for a nice gradient.
Brush in some of the sides to allow for a nice fall off under your chair.
On the front two legs, make a slim “v” shaped selection. Refine this edge and feather your selection.
Create a curves layer and darken it so it looks like a shadow. Do this for both legs in the front.
Flatten your layers and save your new file.
Do you have a product that wasn’t featured in this post? Learn how to apply natural, reflection, and drop shadow to:
It’s worthwhile to try every type of shadow and see which one you prefer, but remember to always use the same type of shadow through a product category and keep your shadows realistic.

Thomas Kragelund is the CEO and founder of Pixelz, a leading product image solutions partner for internet retailers, bloggers, designers, photographers and webmasters worldwide. He has been working in ecommerce for the last 15 years. Sign up today and get 3 product images edited for free.